Monday, May 21, 2012

Grilled Plank Salmon


I have never made a Grilled Cedar Plank Salmon before, so when I was sent a wonderful gift of Cedar Planks and seasonings from Fire and Flavor, I was thrilled to try it. I love seafood and fish, lucky for me, I live on the water. The only fish my kids will eat is Salmon, so I just had a feeling they would love this way of grilling the Salmon. It is super easy and delicious.Fire and Flavor also sent me a Coffee Rub for meats and Salmon. I rubbed some on the salmon and off it went on the grill!


Salmon was delicious with Fire and Flavor Ancho Chile spices on hand cut fries.
Cedar planks have to soak under water for at least one hour.
This is the yummy coffee rub made of Chili Pepper, other spices, pure ground coffee, brown sugar, and salt.
Soak Cedar Planks under cold water so that they don't catch on fire on your grill!
I placed a big bowl full of water on top of the planks so that the planks would be submerged.
Place your lovely filet of Salmon on the plank.
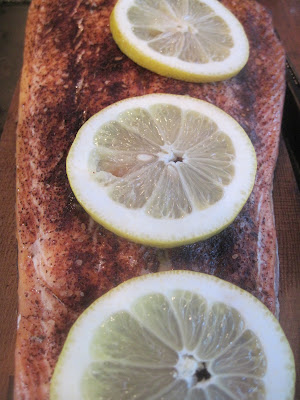
Rub Coffee Rub all over the salmon. Rub, rub, rub, that's why they call it a rub....
Salmon is ready to go on the grill.
Set grill at 350 degrees or Medium setting. The grill's temperature kept raising to 400, so I would try to moderate it so that the Salmon would stay moist. Cook until Salmon is firm to the touch.
Verdict: I liked the coffee rub flavor, it tasted sweet and was a great combination on the Salmon. The Salmon was very moist. Pair it with a Chardonnay, delicious!
 Would I make it again? Yes I would. Another way to use this rub is to make a marinade with orange juice, Olive oil and coffee rub and let Salmon set in marinade in the refrigerator for a couple hours. This post has been linked up these wonderful blogs!Photobucket
Photobucket
Chocolate, Chocolate and more
Posted by Picasa

Monday, May 7, 2012

Guacamole Grilled Cheese Sandwich

We eat a LOT of Grilled Cheese Sandwiches in our home.  We love Grilled Cheese sandwiches so much, that my best friend bought us a Panini maker, oh what a world it is! So when I saw that Mom's Crazy Cooking was having a Grilled Cheese Cooking Challenge, the recipe combinations started going through my head. I typed in Grilled Cheese on Pinterest and it was a Grilled Cheese Extravaganza.........yes, I had made it to Grilled Cheese Heaven and I wasn't going back. There I found the recipe that had me drooling, Guacamole Grilled Cheese Sandwich from Two Peas and Their Pod. ( For this cooking challenge, one must use a recipe from another blog in that exact recipe) Perfect! It is Cinco De Mayo, I am making this a traditional Cinco de Mayo Grilled Cheese!
Mash up two avocados, set aside.
Add chopped red onion, garlic, tomatoes to the mashed avocados.
Add chopped Cilantro. Squeeze lemon juice over guacamole, add salt and pepper to taste, mix well.
 
Use Crusty White Bread for sandwiches.
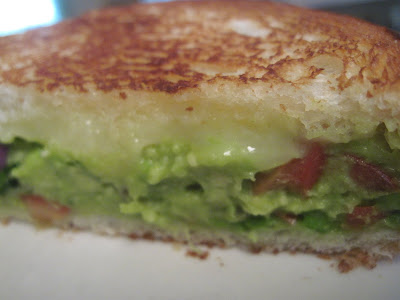
Butter outer side of bread, place tablespoon of guacamole on bread, top with sliced cheddar cheese, grill both sides of bread until golden brown.
 
This was the best Grilled Cheese that I have ever had.Perfect sandwich for Cinco de Mayo or just for a Saturday meal! Scroll down and click #82 if you love this recipe!

Guacamole Grilled Cheese Sandwich


Yield: 2 sandwiches
Prep Time: 5 minutes
Cook Time: 5-7 minutes
The guacamole takes this grilled cheese sandwich to a whole new level of goodness.

Ingredients:

To make the guacamole:
2 ripe avocados
1/2 small onion, minced
1 clove garlic, minced
1 small jalapeño, stems and seeds removed, minced ( I didn't have this on hand, but I would make it with a jalapeno next time)
2 tablespoons cilantro leaves, finely chopped
1 tablespoon of fresh lime juice ( I used fresh lemon juice)
1/2 teaspoon coarse salt
A dash of freshly grated black pepper
1 Roma tomato, chopped

4 slices crusty white bread
4 slices Cheddar cheese ( I used Sharp White Cheddar)
Butter, for buttering bread

Directions:

1. To make the guacamole-cut avocados in half. Remove seed. Scoop out avocado from the peel, put in a large bowl. Using a fork, mash the avocado. Add the onion, garlic, jalapeño, cilantro, lime juice, salt and pepper. Stir until well combined. Add the chopped tomato and stir.
2. Heat a pan or griddle to medium-high heat. Spread desired amount of guacamole on both slices of bread then top with cheese. Butter outer slices of bread and grill on one side for about 2 minutes or until golden and crispy. Flip the sandwich and grill until golden brown. Make the other sandwich the same way and serve warm. Vote for #82 if you love this recipe! Recipe from Two Peas and Their Pod. Go check out the other delicious grilled cheeses, they all look amazing! This post has been linked up to these fabulous blogs! Photobucket

handmade projects Homemade Projects ~ Add Yours! {5/8}

Photobucket
Posted by Picasa
Photobucket

Saturday, May 5, 2012

Mint Julep Granita for the Kentucky Derby


My friend Hillary over at Baking Bad http://bakingbad.com/ Food Blog is having a Virtual Kentucky Derby Party and invited me! When I think of the Kentucky Derby I think of  big beautiful hats and plenty of Mint Julep's. So I came up with a Mint Julep Granita, perfect for cooling you down after you have won 1st Place on your horse in the Derby! The Mint Julep Granita is made from a simple syrup infused with fresh mint, Kentucky Bourbon and  Creme de Menthe, frozen and shaved. Simple and refreshing. 3 simple ingredients: Kentucky Straight Bourbon Whiskey, Creme De Menthe and Fresh Mint.
After freezing over night.
Mint Julep Granita ~ A fabulous frozen treat!

Mint Julep Granita ( An Italian Frozen Dessert)
1 1/2 cups water
3/4 cup (lightly packed) fresh mint leaves (from about 2 small bunches)
1/2 cup sugar

3 tablespoons bourbon

1 tablespoon Crème de Menthe
1 teaspoon minced fresh mint leaves

4 fresh mint sprigs


Combine first 3 ingredients in heavy large sauce pan. Stir over medium heat until sugar dissolves. Increase heat and bring to boil. Pour into medium bowl. Refrigerate until cold, about 2 hours.


Strain mint syrup through sieve set over bowl, pressing on mint leaves. Discard mint leaves. Mix bourbon, Crème de Menthe and minced mint leaves into mint syrup. Mix an additional 1/2 cup of water.   Freeze until semi firm, whisking occasionally, about 3 hours. Cover and freeze until solid, at least 6 hours or overnight. Using fork, scrape surface of granita to form crystals. Scoop crystals into frozen glasses;garnish with mint sprigs, serve immediately.
Bon Appétit
August 1996 This post has been linked up to these wonderful blogs! This post has been featured on
Foodista Featured Drink Blog


Photobucket

2 Maids a Farming on Friday's

Posted by Picasa

Wednesday, May 2, 2012

Braised Short Ribs

A couple of years ago, we were invited to our dear friends home for dinner. It was a very elegant dinner party, with amazing wines and delicious cheeses preceding dinner. Being a cheese lover, I actually over- indulged, so by the time dinner was served, my stomach limit was way over the limit. When dinner was placed in front of me, I stared in awe at my plate. Gorgeous, succulent, melt-in-your-mouth short ribs braised in hearty red wine over a perfectly creamy bed of polenta. Some how I reached for a bite and couldn't stop, flavors dancing in my mouth, of garlic, wine, the most tender beef, falling off the bone, no need for a knife, delicious. I had long forgotten how full I was from those gorgeous cheeses, I couldn't get enough of the ribs! Why did I ask for a small portion, don't listen to me! Why is hubs sitting all the way across from me? Will anyone notice if I stand up and lean all the way over to his plate... I have been dreaming of those short ribs ever since. But where I live, short ribs can not be found in the food markets. What? How is this possible? How does a girl's dream come true without short ribs?? So I have been on a search, for months, years, and then.....a new market! A new butcher! "Sure" he says, "I can get you short ribs, how much do you want?" How about 50 pounds? Who knows when I will be able to find them again..."I'll take 3 1/2 pounds, please".
Genrously salt and pepper and season with Oregano.
Next time, I am making a double batch.
Chopped onions, carrots, celery, garlic.
Add 1 large can plum tomatoes.
Let's just admire these gorgeous short ribs that I have been dreaming of for years, thank you for visiting.
Short Ribs with salt and pepper and Oregano
Served over a bed of garlic mashed potatoes.

Ingredients

  • 8 bone-in short ribs (about 4 1/2 pounds)
  • Kosher salt
  • Fresh Ground Pepper
  • 2 tablespoons Oregano
  • 1 large Spanish onion, cut into 1/2-inch pieces
  • 3 ribs celery, cut into 1/2-inch pieces
  • 3 carrots, cut into 1/2-inch pieces
  • 3 cloves garlic, smashed
  • 1 can peeled plum tomatoes ( 28 ounces)
  • 2 cups hearty red wine
  • 4 cups homemade chicken broth

Directions

Season each short rib generously with salt and pepper and Oregano. Coat a pot large enough to accommodate all the meat and vegetables with olive oil and bring to a high heat. Add the short ribs to the pan and brown very well, about 2 to 3 minutes per side. Do not overcrowd pan. Cook in batches, if necessary.
Preheat the oven to 350 degrees F.
While the short ribs are browning, puree all the vegetables and garlic in the food processor until it forms a coarse paste. When the short ribs are very brown on all sides, remove them from the pan. Drain the fat, coat the bottom of same pan with fresh oil and add the pureed vegetables. Season the vegetables generously with salt and brown until they are very dark and a crud has formed on the bottom of the pan, approximately 5 to 7 minutes. Scrape the crud and let it reform. Scrape the crud again and add the tomatoes. Brown the tomatoes for 4 to 5 minutes. Add the wine and scrape the bottom of the pan. Lower the heat if things start to burn. Reduce the mixture by half.
Return the short ribs to the pan and add 2 cups chicken broth or until the water has just about covered the meat.  Cover the pan and place in the preheated oven for 3 hours. Check periodically during the cooking process and add more water, if needed. Turn the ribs over halfway through the cooking time. Remove the lid during the last 20 minutes of cooking to let things get nice and brown and to let the sauce reduce. When done the meat should be very tender but not falling apart. Serve with the braising liquid.THIS RECIPE HAS BEEN LINKED UP TO THESE WONDERFUL BLOGS: Photobucket
Photobucket
Posted by Picasa